
There’s a special sense of accomplishment that comes with placing the final piece of a jigsaw puzzle. Instead of breaking it apart and returning it to the box, framing your completed puzzle transforms hours of dedication into a permanent piece of art. Whether it’s a beautiful landscape, a nostalgic photograph, or a challenging piece of art, displaying your puzzle allows you to celebrate your achievement and add a personal touch to your home decor.
Framing a puzzle isn’t as simple as just placing it in a frame. Puzzles have thickness and can be fragile without proper stabilization. This comprehensive guide will walk you through every step of the process, from securing the pieces to choosing the perfect frame, ensuring your hard work is preserved for years to come.
Preparing Your Puzzle for Framing
Before you even think about a frame, proper preparation is crucial. Rushing this stage can ruin an otherwise perfectly completed puzzle.
First, ensure your puzzle is completely assembled on a flat, stable surface. Carefully inspect for any loose pieces or raised areas. Gently go over the entire surface with a rolling pin to flatten any slightly raised pieces and create an even surface . This helps the adhesive bond properly later on.
Next, give your puzzle a light cleaning. Use a slightly damp cloth, wrung out thoroughly to avoid dripping, and gently wipe the surface to remove any dust or puzzle debris . Excess moisture can damage the puzzle, so ensure the cloth is just damp, not wet. Let the surface dry completely before moving to the next step.
How to Preserve and Secure Your Puzzle
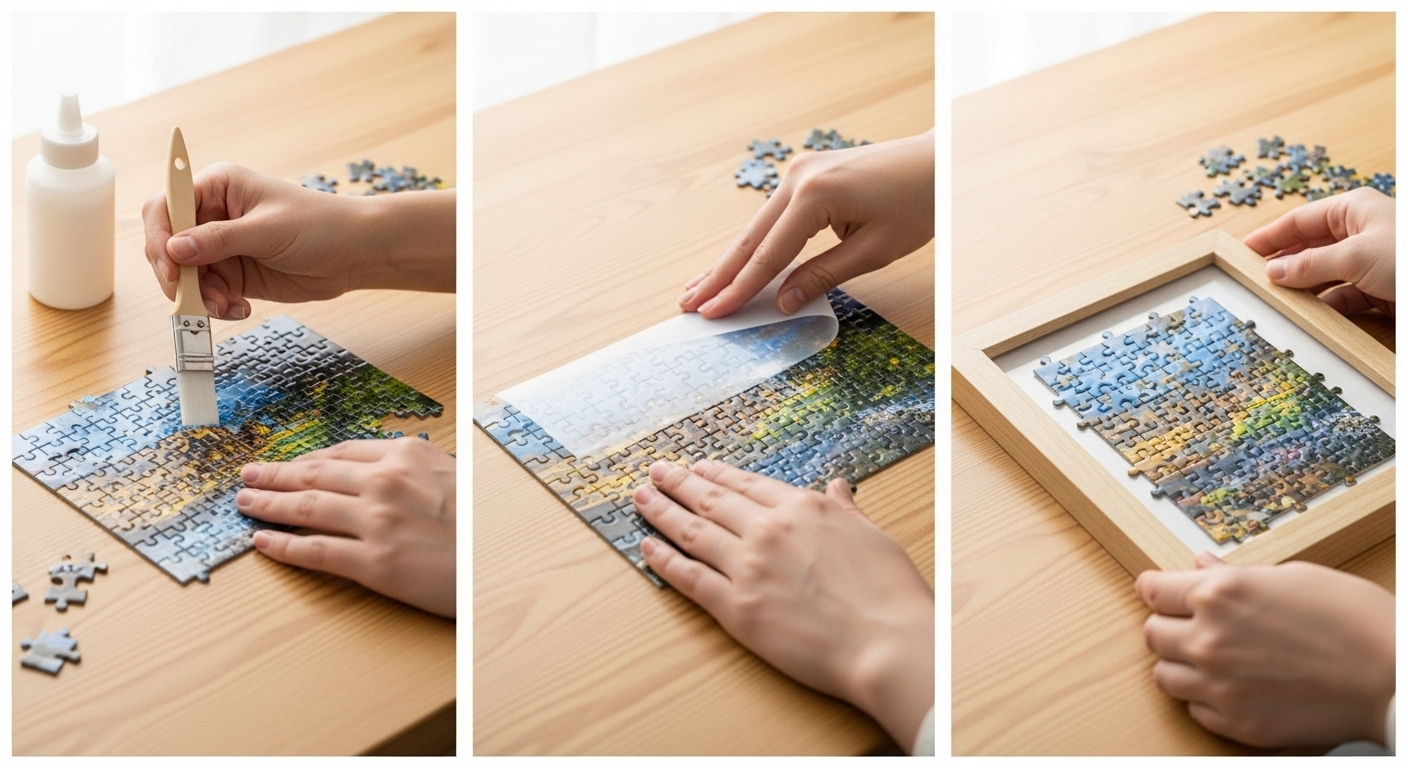
This is the most critical step in the framing process. Without stabilization, your puzzle could shift, sag, or even fall apart inside the frame. You have two main options for securing the pieces: using liquid glue or adhesive sheets.
Method 1: Using Puzzle Glue
Puzzle glue is the most common and often the most effective method for binding pieces together .
What You’ll Need:
- Quality puzzle glue (acid-free is best for long-term preservation)
- A foam brush, spatula, or even an old credit card for spreading
- Wax paper or a protective sheet for your work surface
Step-by-Step Process:
- Protect Your Surface: Slide a piece of wax paper or another non-stick material under your puzzle to protect your table from glue .
- Apply the Glue: Pour a line of glue across the puzzle and use your spreading tool to create a thin, even layer across the entire surface. Ensure the glue gets into all the cracks between pieces without over-saturating them .
- Clean Excess: Wipe away any excess glue with a paper towel.
- Let it Dry: Allow the glue to dry completely according to the product instructions, usually at least 4 hours . It will turn clear once dry.
- Reinforce the Back (Recommended): For extra stability and to prevent curling, carefully flip the puzzle over once the front is dry. This requires two large, flat boards or pieces of cardboard to sandwich the puzzle for a safe flip. Apply a thin layer of glue to the back as well and let it dry completely .
Pro Tip: Avoid using bristled paintbrushes, as they can leave visible brush strokes on your puzzle’s surface .
Method 2: Using Adhesive Sheets
For those who want to avoid the mess of liquid glue, peel-and-stick puzzle saver sheets are an excellent alternative .
What You’ll Need:
- Adhesive sheets (like Puzzle Presto or Galison glue sheets)
- Two stiff boards (cardboard or foam board) larger than your puzzle
- A rolling pin
Step-by-Step Process:
- Sandwich and Flip: Carefully place your puzzle between two stiff boards and secure them with binder clips or tape. Flip the entire assembly over so the back of the puzzle is facing up .
- Apply the Sheets: Peel the backing off the adhesive sheets and apply them to the back of the puzzle, following the product’s instructions.
- Apply Pressure: Use a rolling pin to apply even pressure across the sheets, ensuring a strong bond with every piece .
Choosing the Right Frame and Mounting Style
Once your puzzle is securely glued, it’s time to choose how you’ll frame it.
Accurate Measurement is Key:
Never rely solely on the dimensions printed on the puzzle box, as the actual assembled size can vary slightly . Use a ruler or tape measure to get the exact length and width of your completed puzzle. For non-rectangular puzzles, measure the widest points in both directions . Also, note the puzzle’s thickness, as this will affect your frame choice.
Frame Style Options:
You have two primary choices for how your puzzle will sit within the frame:
- Straight Fit (Framing to Size): This is the simplest method, where the frame fits the puzzle exactly with no matting. It provides a clean, modern look and is ideal if you’ve mounted your puzzle on a foam board backing .
- Float Mounting: In this stylish and popular option, the puzzle is centered on a matboard backing with a visible border of space all around it. The puzzle appears to “float” within the frame. This is a great way to show off the entire puzzle, including its edges, and add a professional touch . For this style, a “Sandwich Float” is recommended, which keeps the puzzle pressed securely in place .
Acrylic vs. Glass Covering:
While glass is a traditional choice, acrylic is often recommended for puzzles . Glass is heavier and can attract moisture over time, which poses a risk of it becoming glued to the front of your puzzle. Acrylic is lighter, safer, and we offer UV-filtering options to protect your puzzle image from fading over time .
Step-by-Step Guide to Framing Your Puzzle
With your puzzle secured and your frame selected, it’s time for final assembly.
- Prepare Your Workspace: Work on a clean, flat surface. If your frame has glass or acrylic, clean it thoroughly with glass cleaner and a lint-free cloth to remove any dust or smudges.
- Add Backing (If Not Already Done): For extra rigidity, many puzzlers mount their glued puzzle to a backing. Apply a layer of craft glue to a piece of foam board cut slightly smaller than your puzzle, center it on the back, press firmly, and place heavy books on top to dry for several hours .
- Secure the Puzzle in the Frame:
- Close Up the Frame: Secure the backing board into the frame according to the frame’s design (this may involve turning tabs or using screws).
- Display and Enjoy!: Hang your framed puzzle in a place away from direct sunlight to prevent fading, and admire your handiwork every day.
Troubleshooting and Creative Display Ideas
- Problem: Puzzle curling after gluing.
Solution: This often happens if glue was only applied to one side. Flip the puzzle and apply a thin layer of glue to the back to even out the tension . - Problem: Dealing with a missing piece.
Solution: You can still frame it! Fill in the gap with a piece of colored cardstock that matches the background, or contact the puzzle manufacturer—they sometimes offer replacement pieces.
If you have multiple puzzles you’d like to display, consider creating a gallery wall. Mix and match frame styles for a curated look, or use identical frames for a uniform display. For a truly unique piece, some artists like Tim Klein create “puzzle montages” by combining pieces from different puzzles to form new, surreal images . This is an advanced but creative way to showcase your puzzling prowess.
Frequently Asked Questions (FAQs)
1. Can I frame a puzzle without using glue?
Yes, using adhesive sheets applied only to the back is an effective glue-free method . Another option is to carefully mount the unglued puzzle onto a sticky board, though this can be trickier and is less permanent.
2. What should I do if my puzzle is an unusual shape?
For non-rectangular puzzles, float mounting is often the best solution. Measure the puzzle at its widest points, choose a frame based on those dimensions, and center the puzzle on the backing with your desired amount of spacing around it .
3. My framed puzzle fell and pieces came loose. How can I fix it?
If the damage is minor, you can carefully apply a small amount of puzzle glue with a toothpick to reattach loose pieces. For significant damage, you may need to disassemble the frame, flip the puzzle over, and reinforce the back with a new adhesive sheet.
4. Is it better to glue the front or the back of the puzzle?
For maximum stability, both sides should be glued. Gluing the front seals and protects the image, while gluing the back provides structural integrity and helps prevent the puzzle from curling over time .
5. How do I handle a very large or heavy puzzle for framing?
For puzzles over 2000 pieces, having a helper is crucial when flipping and framing. Ensure you use a sturdy, professional-grade frame and secure hanging hardware appropriate for the weight. For extra-large puzzles, consider professional framing services for added security.
6. Can I use Mod Podge instead of puzzle glue?
Yes, Mod Podge (specifically the formula for paper) is a popular alternative to brand-name puzzle glues. Apply it in the same way, using a thin, even layer to avoid visible brush strokes .
7. How do I clean a framed puzzle?
Dust the frame and the acrylic/glass surface as you would any other picture frame. Do not use liquid cleaners directly on the puzzle itself, and avoid getting moisture inside the frame.
Conclusion
Framing a jigsaw puzzle is a rewarding final step that turns a temporary hobby into a lasting display of patience and dedication. By carefully securing your pieces with glue or adhesive sheets and selecting the right frame and mounting style, you can ensure your masterpiece remains intact and beautiful for years to come. The process is a simple yet satisfying DIY project that any puzzle enthusiast can master. So, don’t box up your next completed puzzle—frame it, hang it, and let it tell a story of your accomplishment.
Now that you’ve mastered the art of the puzzle, will you frame your next one?